
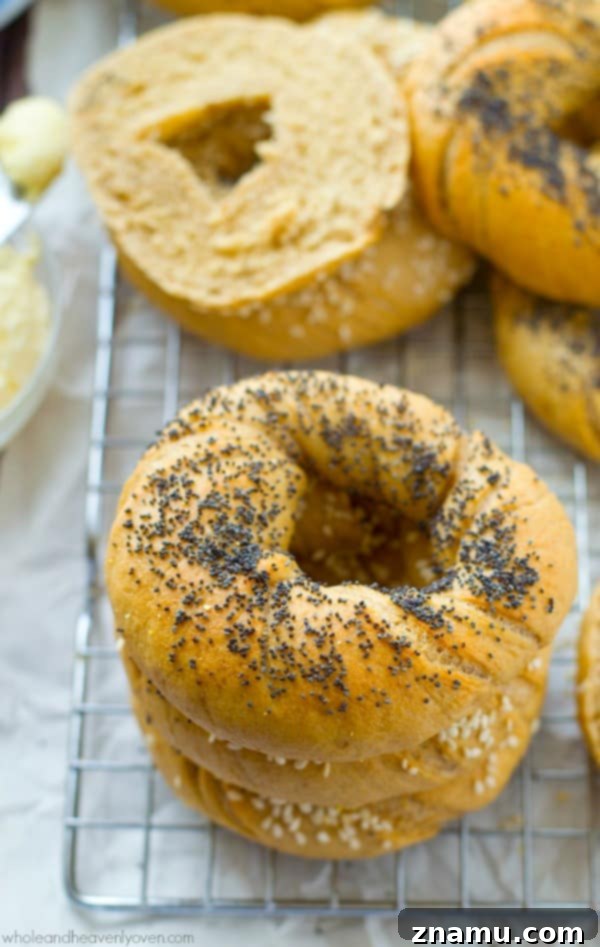
Forget the frantic morning dash for store-bought bagels. Imagine waking up to a fresh batch of these simple, deli-style homemade bagels – softer, chewier, and more satisfying than anything from a bakery. And the best part? They’re incredibly freezer-friendly, ensuring you always have a delightful breakfast on hand.

BAGELS. The mere mention of the word evokes comfort, a perfect morning treat, or a hearty lunch. Now, imagine homemade, deli-style bagels right in your kitchen! There’s a profound satisfaction that comes with crafting these doughy delights from scratch, transforming simple ingredients into something truly special. Get ready for a carb-loaded journey to culinary bliss.

The Irresistible Allure of Homemade Deli-Style Bagels
Lately, my kitchen has transformed into a miniature bakery, a haven for crafting delicious treats that rival—and often surpass—their store-bought counterparts. From bakery-style blueberry almond crumble muffins to these incredible deli-style bagels, I’ve found a newfound joy in creating. It’s almost as if I’m on a mission to put local establishments out of business, especially since my new espresso maker arrived! This domestic transformation has been a pleasant surprise, turning me into a Martha Stewart in the making, much to my own amazement.

Pardon my momentary enthusiasm – the morning coffee is still brewing, and the sheer joy of a freshly toasted, butter-smothered homemade bagel in my hand has my emotions running high. Knowing there’s a substantial stash of these beauties patiently waiting in the freezer only adds to my contentment. It’s these small, comforting pleasures that truly brighten the day, reminding us that sometimes, the simplest things bring the most profound happiness. ♥
From Bakery Runs to Baking at Home
We all understand the wonderful, almost ritualistic emotions tied to those bagels picked up from a deli or bakery for brunch. For many, it’s a weekly, sometimes even daily, indulgence. I confess, I once had a deep, almost spiritual connection with those convenient, carb-loaded wonders. But a thought began to percolate: “What if homemade bagels could solve all the world’s problems, or at least save my wallet from constantly being on empty?” This curiosity led me down a delightful rabbit hole, and the result? Homemade bagels, not just once, but five times in the past few weeks. I’m utterly smitten, and I think you will be too.

Unlocking the Perfect Bagel Texture
The quest for the perfect bagel often centers around its texture, and these homemade marvels achieve nothing short of perfection. They boast an unbelievably soft interior that contrasts beautifully with that distinct, satisfyingly chewy crust we all adore. This harmonious combination ensures a bagel that toasts up flawlessly, creating an experience that goes beyond simply eating – it’s a moment of pure culinary delight. Every bite delivers a chewy resistance followed by a tender yielding, making it a true testament to the art of bagel making.

Simple Steps to Your Best Homemade Bagels
Now, dear friends, do not let the idea of making homemade bagels intimidate you. I promise, wholeheartedly, that these little wonders are surprisingly simple to create! You absolutely can do it, and I am here to guide you through every easy step. The process is far less daunting than it might seem, and the rewards are immense.
Crafting the Dough: Foundation of Flavor
The journey begins with the dough, which comes together effortlessly in a stand mixer in less than five minutes. You won’t need any exotic ingredients either! Just warm water, active dry yeast, a touch of sugar and salt, and flour are all it takes to form the foundation of these incredible bagels. The simplicity of the ingredients belies the incredible flavor they produce. Furthermore, this dough is incredibly cooperative and easy to handle – no sticky, messy fingers here, making the kneading process a breeze and genuinely enjoyable.
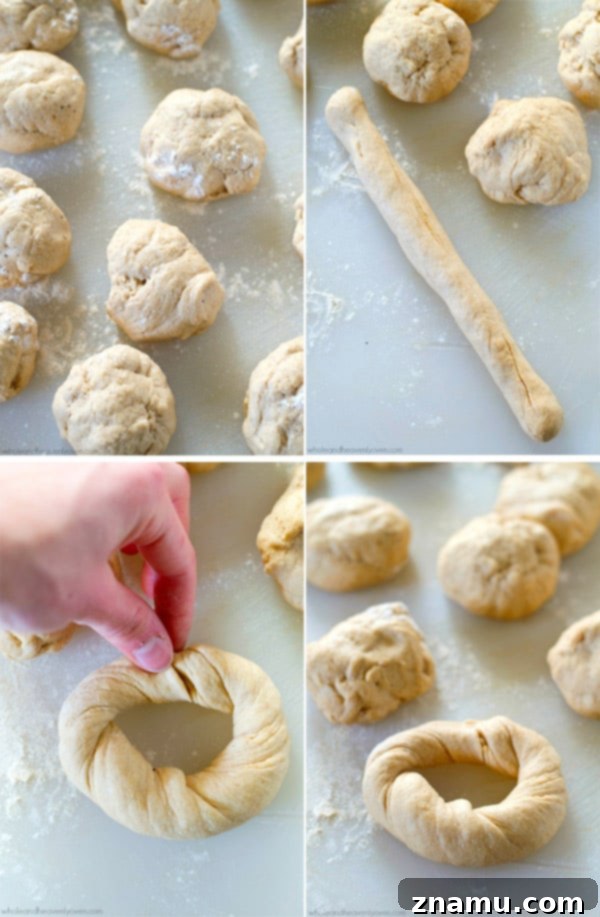
Here’s a visual guide to shaping the bagels once your dough has beautifully risen:
The Boil and Bake: Keys to Authenticity
After shaping, the bagels undergo a short, relaxed 30-minute second rise. This brief period allows them to puff up slightly, preparing them for the crucial next step: a quick dip in boiling water. This boiling process, a hallmark of traditional bagel making, is what gives them their signature chewy crust and helps set their shape. After their hot bath, they’re whisked into a very hot 400°F (200°C) oven for about 20-25 minutes, where they transform into golden-brown perfection.
And before they hit the oven, don’t forget to customize these babies with your favorite toppings! My family gravitates towards classic poppyseeds and sesame seeds, but the possibilities are truly endless. Next time, I’m planning a generous dusting of cinnamon sugar for a sweet twist. Imagine an everything bagel seasoning, or even some shredded cheese for a savory delight. The choice is yours!

Versatile Ways to Enjoy Your Homemade Bagels
The versatility of these homemade bagels is truly astounding. Start your day with a killer breakfast egg sandwich, piling on your favorite fillings. Or, toast one up and smother it with a rich layer of peanut butter, a dollop of sweet jam, a drizzle of honey, or the classic cream cheese. For a savory twist, consider smoked salmon and capers, or a flavorful avocado spread.
Alternatively, if patience isn’t your strong suit (and who could blame you?), simply eat them straight off the baking sheet. Sometimes, the freshest bagels are best enjoyed in their purest form, no manners required. Finders keepers, after all! Whether you prefer them plain, toasted, or loaded with toppings, every bite promises a satisfying experience.

No matter how you choose to savor these bagels, the experience will undoubtedly be awesome. Because, honestly, with perfectly soft and chewy deli-style homemade bagels, how could you ever go wrong? The most important thing is simply to make them. Like, right now. You won’t regret it!


Deli-Style Homemade Bagels
Skip the bagel-run on busy mornings and instead whip up a batch of these simple deli-style bagels that you’ll love even more than the bakery ones. They’re unbelievably soft, chewy and also freezer-friendly!
This recipe may included paid links. As an Amazon Associate, I earn a commission from qualifying purchases.
Ingredients
- 2 packages active dry yeast (4-1/2 teaspoons)
- 2 cups warm water (110F)
- 3 tablespoons coconut sugar (or brown sugar)
- 2 teaspoons salt
- 5 to 5-1/2 cups white whole wheat flour
- Cornmeal for baking sheets.
- Sesame seeds and/or poppyseeds for topping
Instructions
-
In the bowl of a large stand mixer fitted with a paddle attachment, dissolve yeast in warm water. Let stand for 5 minutes or until foamy. Mix in sugar and salt. With mixer running on medium speed, add 5 cups flour until mixture forms a stiff dough. (If dough seems too sticky, mix in additional flour by the tablespoon until it comes together).
-
Turn dough onto a floured surface and gently knead until smooth and elastic. Place in a greased bowl, turning once to grease top. Cover bowl with plastic wrap and allow to rise in a warm place until doubled in size, about 1 hour.
-
Punch down risen dough and divide into 15 pieces. Use your hands to roll each portion into a 8-inch rope. Twist ropes and then bring ends together and pinch to seal. Place bagels on parchment paper-lined baking sheets, dusted with cornmeal. Allow bagels to rise 30 minutes or until doubled in size.
-
Place 8 cups water in a large pot. Bring to a boil over high heat. Once boiling, cook bagels in batches of three 30 seconds on each side. Return bagels to baking sheets and sprinkle with sesame seeds and poppyseeds.
-
Bake bagels at 400F (200°C) for 20-25 minutes or until golden-brown. Cool bagels on wire cooling racks. Serve bagels toasted with cream cheese, peanut butter, jam, etc.
Notes
Apologies for the visual feast with the abundance of photos today. As I mentioned, I’m utterly obsessed with these homemade bagels!